For a COB LED wall in a room with controlled lighting, 300–800 nits is a useful initial brightness class to investigate. For brighter indoor spaces without direct sunlight, compare 800–1,200-nit オプション。 強い環境光 may justify evaluating 1,200–2,500-nit 製品。
These are broad product-screening bands adapted from published direct-view LED supplier guidance, not mandatory COB operating settings. A dim room may need substantially less than 300 nits in use; sunlight-facing installations require separate assessment. The number to purchase against is the calibrated output your project needs, while the number operators use may change throughout the day.
1. COB LED Display Brightness Ranges for Initial Selection
Nits describe luminance: 1 nit equals 1 cd/m². COB is a packaging technology, so the COB label alone does not determine the required output.
The following bands describe product brightness classes for initial comparisons, not the settings operators should use. Confirm each candidate's calibrated output and usable dimming range.
|
照明条件
|
Initial brightness class
|
確認しなければならないことは
|
|
Low or controlled indoor light
|
300~800ニット
|
Comfortable dimming and usable dark detail
|
|
Brighter indoor light, without direct sun
|
800~1,200ニット
|
Readability during the brightest operating period
|
|
Strong indoor ambient light
|
1,200~2,500ニット
|
Whether added output helps enough after addressing reflections
|
|
Direct sun or outdoor operation
|
Separate sunlight-specific selection
|
Visibility, environmental suitability and night-time dimming
|
A meeting room, lobby or event venue can fall into different rows depending on its windows and lighting. Choose by conditions, not the room name.
To narrow this shortlist, check how light reaches the screen and what viewers must read.
2. How Ambient Light and Content Affect Brightness Requirements
A wall in a daylit lobby may need higher output than the same wall in a room with controlled lighting. Brighter surroundings make image differences harder to distinguish, so additional luminance can help preserve readability. In a dark room, the same setting can feel uncomfortable, especially with large white areas.
Reflected light also raises the apparent black level, reducing contrast under ambient light. Higher output can strengthen bright content but cannot remove a window reflection. Where reflections obscure dark details, blinds, redirected lighting or a different screen position may help more than extra nits.
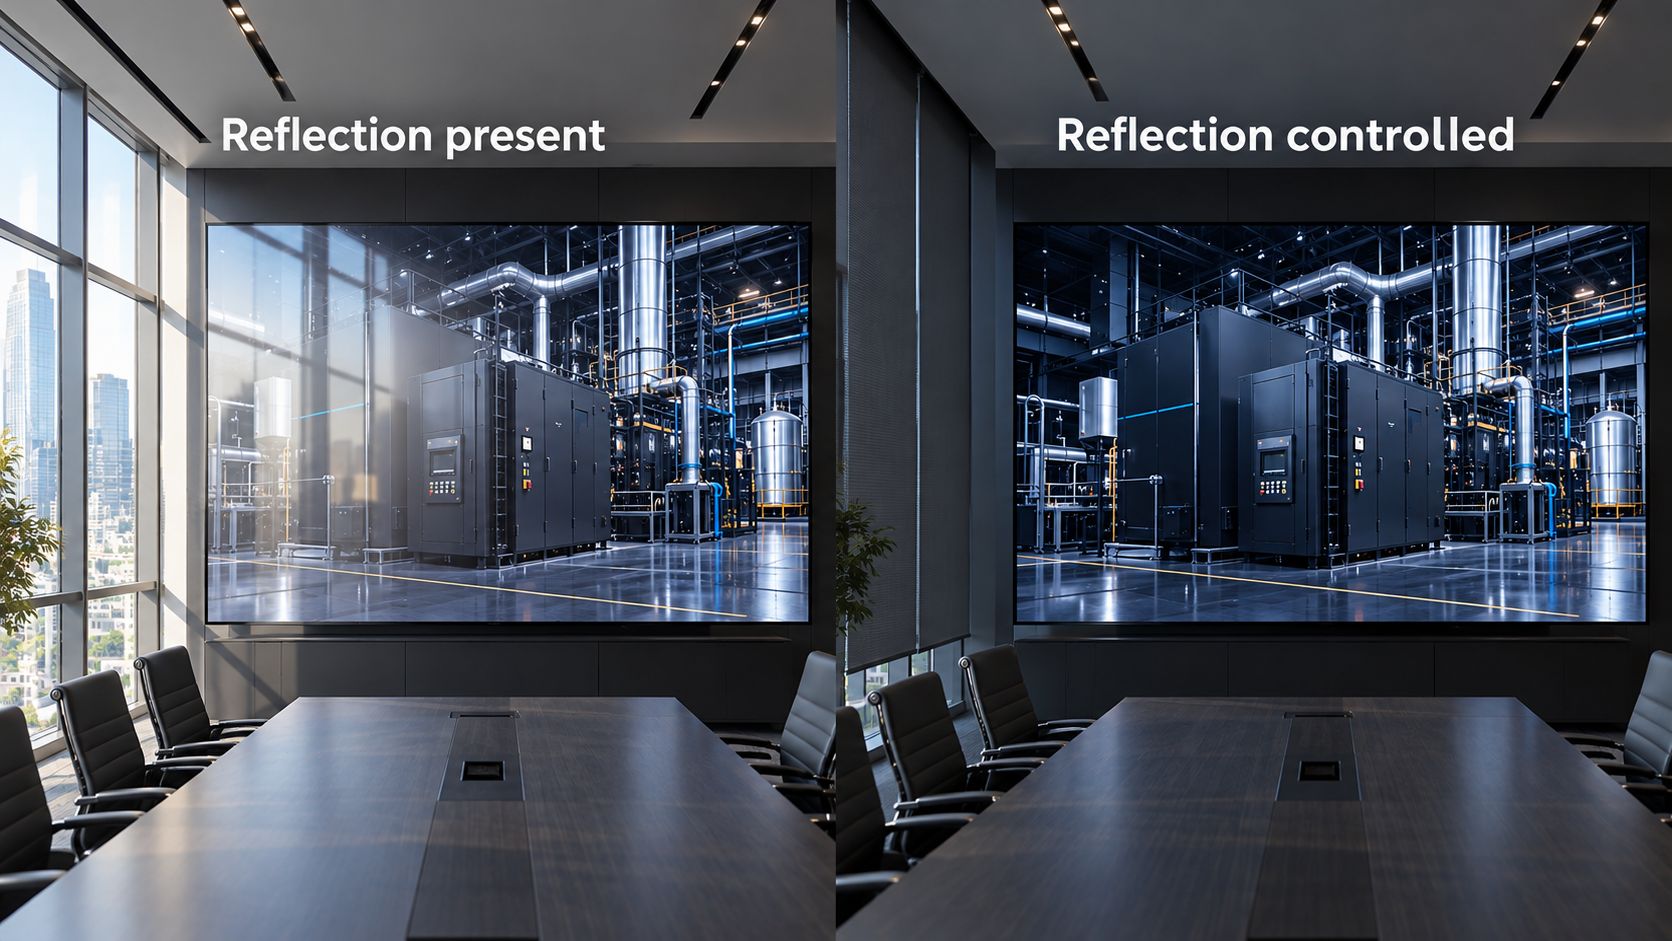
Figure 1. At a fixed display output, reducing window reflections makes dark image details easier to distinguish.
Content changes what counts as sufficient brightness:
-
White slides and spreadsheets need readable text without an overwhelming bright surface. Small text also depends on size and resolution; more brightness cannot correct either limitation.
-
CCTV and dark video require distinguishable shadow details. Brighter highlights alone do not establish that important dark information is visible.
-
Advertising and large graphics need a clear message during the brightest operating period. Vivid demonstration footage does not establish that all campaign material will remain legible.
-
ステージ背景 must work alongside presenter lighting and camera exposure, which can constrain the usable output.
These differences explain why a project may need several operating settings. Define the required content and lighting conditions before deciding which part of the initial brightness range is useful.
3. How to Determine the Right Operating Brightness
Record the brightest, normal and darkest conditions during operating hours, including windows, lighting and blinds. If measuring lux, place the sensor near the screen plane, facing outward. Record its position; lux alone cannot determine required nits.
Use a sample matching the proposed COB surface, controller, calibration and operating mode. Reproduce site lighting and use several cabinets where possible; a small sample cannot establish whole-wall viewing comfort.
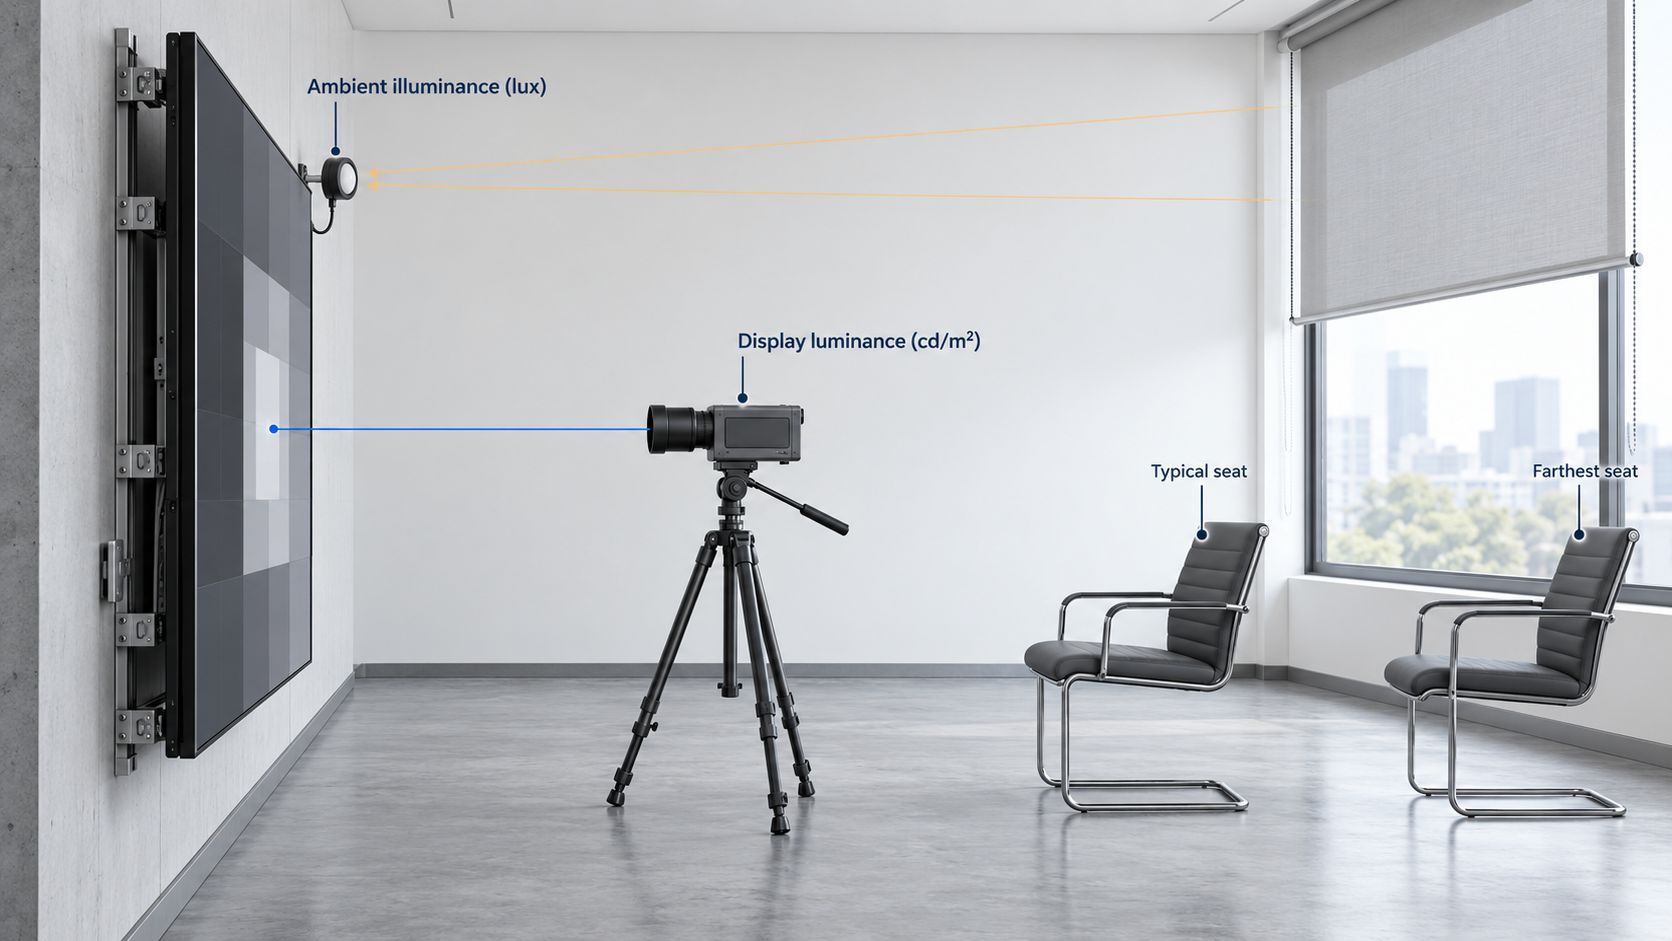 Figure 2. Measure ambient illuminance near the screen plane and display luminance from the screen's viewing side.
With the site conditions and sample ready, use the following sequence to find the lowest output that meets visibility, comfort and picture-quality requirements under each lighting condition. These accepted settings define your operating range.
(1) Fix the image pipeline.
Keep content, signal range, white point, gamma and calibration unchanged. Use the intended display brightness control.
(2) Establish the bright-condition setting.
Increase measured output in steps until actual content is clear. For a candidate supporting them, 300, 500 and 700 nits are trial points, not prescriptions. Refine the steps near the passing level. If dark details remain obscured, compare blinds open and closed at fixed output before increasing brightness further.
(3) Check viewing positions.
Read required text from the farthest position, inspect shadows from typical seats and assess white-heavy content near the screen.
(4) Repeat in normal and dark conditions.
Lower output while retaining required visibility and acceptable picture quality. Assess comfort over realistic viewing periods.
(5) Document the range.
Record measured nits, controller setting, lighting and content for each accepted condition. Use a suitable luminance instrument; Section 5 specifies the measurement conditions.
For example, accepted settings of 250 nits at night, 450 nits normally and 700 nits at the brightest time establish a 250–700-nit requirement. An 800-nit candidate must still demonstrate calibrated, sustained output at the upper end and acceptable dimmed images at 250 nits. Agree additional capacity for documented lighting variation and maintenance needs. These numbers illustrate the decision, not a universal recommendation.
4. How to Check Grayscale, Color and Uniformity at Low Brightness
The lower end of your operating range needs its own acceptance check. A brighter model is useful only if dimming preserves the picture quality required for normal use.
If grayscale becomes unacceptable when the wall is dimmed but looks normal at higher output, increasing brightness does not establish suitability for a darker room. We recommend including the intended low-brightness setting in the demonstration, with particular attention to shadow detail and smooth gray gradients.
At the lowest, normal and highest intended settings, inspect the same materials:
|
試験材料
|
受け入れチェック
|
|
Near-black steps and gray gradients
|
Required shadow levels remain distinguishable; no unacceptable bands or tint
|
|
Uniform dark gray, mid-gray and white
|
No unacceptable module-to-module brightness or color differences
|
|
Color gradients and actual brand graphics
|
Smooth transitions and acceptable color appearance
|
|
Real presentation and video files
|
Required information remains visible without uncomfortable bright areas
|
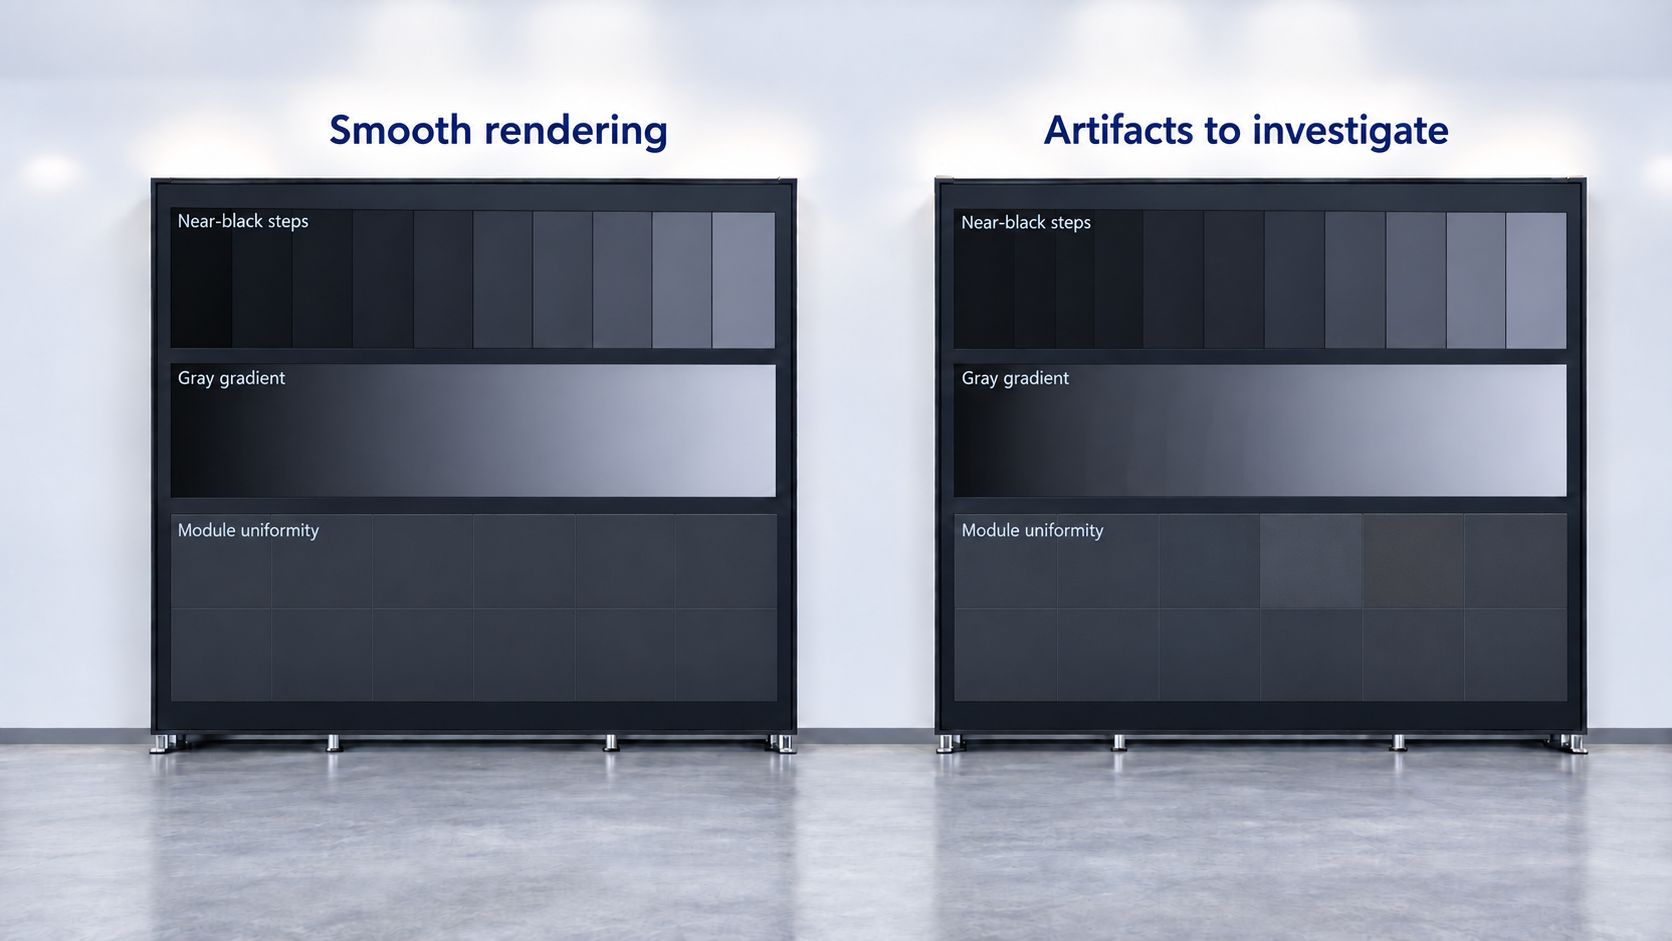 Figure 3. Check near-black steps, gradients and module uniformity at the intended low operating brightness.
A specification of native 16-bit grayscale does narantee smooth gradients after dimming. Use the patterns above to assess actual performance, and agree which shadow details must remain visible under each lighting condition.
The driver, PWM, LED scan ratio, processing and calibration all affect the result. Ask the supplier to confirm brightness, refresh rate and grayscale for the same operating configuration. Some compatible modes lower maximum output while preserving PWM bit depth to improve dimmed images; COB packaging alone does not guarantee this capability.
Record any bands, tint or module differences with their brightness setting and test pattern for supplier review. Raising output until a defect disappears does not qualify the required lower setting.
5. How to Verify Calibrated Brightness and Sustained Output
The upper end of the required range must be available in the delivered configuration. Maximum output, calibrated output and sustained output answer different questions: how high the wall can go, what remains with correction enabled, and what it can maintain over time. A small-window peak is not equivalent to sustained full-screen white.
Use a suitable luminance meter reading cd/m²; a basic lux meter cannot verify screen nits. Agree the white point, test pattern and white area, operating mode, warm-up, ambient temperature, measurement geometry and allowable variation.
With the agreed calibration data loaded and enabled, measure the center and additional positions, such as a nine-point grid. Record minimum, average and maximum readings. Control ambient light when verifying product output and compare results with the agreed requirement; assess installed visibility separately under site lighting.
To verify sustained output, run representative content and a supplier-approved high-load pattern at the highest planned setting, with the intended ventilation. Record LED display power consumption and operating temperature alongside luminance throughout the agreed duration. Measure AC input power and temperatures at specified locations. Check for output falling below the requirement, color drift or alarms. Agree limits and duration before testing; a brief initial reading cannot establish continuous performance. Infrastructure sizing must still use maximum electrical specifications.
6. How to Set Brightness Presets for Day, Night and Cameras
Convert the accepted range into named presets tied to actual conditions: daytime with normal blinds, presentation lighting, and evening operation. Store each measured nits value with its controller setting, calibration and operating mode. Operators should know when each preset applies.
Recall presets through the final control interface, check whole-wall consistency and restart the system to confirm retention. For automatic adjustment, verify sensor placement, response delay and limits against the approved range. Rental teams should reassess each venue.
A camera preset needs additional validation. Set exposure for presenters under the intended lighting, then adjust the wall while checking audience visibility. Use the actual cameras, frame rates and shutters; examine recorded faces, white areas and saturated colors, using waveform or RGB scopes where available.
Check every required camera before saving that preset. If only one produces abnormal colors, investigate its exposure and color pipeline. Diagnose flicker, scan bands and synchronization separately; adjusting nits alone may not resolve them.
7. COB LED Display Brightness FAQs
Q1: Is 800 nits enough for a COB wall beside windows?
A1: It can be sufficient if calibrated, sustained output meets the tested daytime requirement and the wall dims adequately at night. Check actual content and window reflections during the brightest occupied period. Direct sun needs separate assessment; the 800-nit label alone cannot establish suitability.
Q2: Why is the wall still too bright at 10%?
A2:The percentage does not establish absolute luminance. It depends on the available output and control implementation. Measure nits, check white-heavy content and validate a lower setting. Do not copy another installation's percentage.
Q3: Can I reduce content opacity instead of display brightness?
A3: Opacity blends content with underlying layers and changes pixel values. Use the validated display brightness control for overall output, then inspect colors and gradients. Treat persistent color errors as a signal-chain or calibration investigation.
Q4: Will a finer pixel pitch compensate for insufficient brightness outdoors?
A4: No. Pixel pitch concerns spatial detail; it cannot replace adequate visibility under ambient light. Compare readability and brightness separately. Indoor COB selection bands do not settle whether 4,000 or 5,000 nits will work for a particular outdoor event.
Q5: What should I check if modules look different after dimming?
A5: Keep the content unchanged and compare the intended software and controller controls. If the difference appears through only one control path, ask the supplier to check configuration and communication with the receiving cards. Verify calibration and source levels before concluding that the modules need replacement.
8. 結論
Specify the accepted minimum, normal and highest operating nits, together with lighting conditions, calibration, sustained-output criteria and image-quality requirements. That gives the supplier a deliverable range and the buyer a repeatable acceptance method.
Premtecoを送信 your lighting conditions, screen size, content and operating hours to discuss a COB LED shortlist and a brightness demonstration matched to your project.




